Learning how to make aquafaba from scratch is one of those small kitchen hacks that feels life-changing, especially if you’re vegan, egg-free, or simply love experimenting with new techniques. With your Instant Pot and a bag of dried chickpeas, you can create a silky, reliable egg substitute that unlocks a world of recipes – from cakes to mousses.

Jump to:
- Introduction: What Is Aquafaba and Why Use It?
- Why Use an Instant Pot for Aquafaba?
- Ingredients and Equipment You’ll Need
- Step-by-Step Guide to Making Aquafaba in the Instant Pot
- How to Use Homemade Aquafaba
- Troubleshooting: Common Rookie Mistakes
- Health Benefits of Making Your Own Aquafaba
- Serving and Pairing Ideas
- Final Thoughts
- Recipe
Introduction: What Is Aquafaba and Why Use It?
If you’ve ever opened a tin of chickpeas and wondered what to do with that leftover liquid, you’ve already encountered aquafaba. Literally meaning “bean water” (from the Latin words aqua = water, faba = bean), aquafaba is the thick, starchy liquid left after cooking chickpeas or other legumes.
What makes aquafaba so special? It behaves like egg whites in recipes – it whips into stiff peaks, emulsifies like a dream, and works as a binder in baked goods. From fluffy meringues to rich chocolate mousse, mayonnaise, and even cocktails, this humble liquid has earned its place as a vegan kitchen staple.
Most people first try aquafaba from canned chickpeas, but if you want a more cost-effective, zero-waste, and cleaner version, making your own from dry chickpeas is the way to go. Today, I’ll walk you through how to make perfect aquafaba using dry chickpeas and an Instant Pot – no tins, no additives, just pure magic.
Why Use an Instant Pot for Aquafaba?
Cooking chickpeas on the stovetop can take hours, and getting the liquid to the right consistency is a bit of an art. With an Instant Pot (or any electric pressure cooker), you can:
- Save time: Chickpeas go from dry to perfectly cooked in under an hour.
- Get consistent results: The pressure locks in flavour and starch, giving you a richer aquafaba.
- Control thickness: You can adjust the water-to-bean ratio for the exact consistency you need.
- Batch cook: Make enough chickpeas for salads, curries, and hummus, while saving the liquid for baking.
Ingredients and Equipment You’ll Need
- 250 g dry chickpeas (about 1 heaping cup)
- 1 litre water (for pressure cooking)
- Instant Pot or electric pressure cooker
- Fine mesh sieve or cheesecloth
- Large bowl
- Airtight jar or container (for storage)
Optional: pinch of salt (though if you want aquafaba for sweet recipes, it’s better to leave it unsalted).

Step-by-Step Guide to Making Aquafaba in the Instant Pot
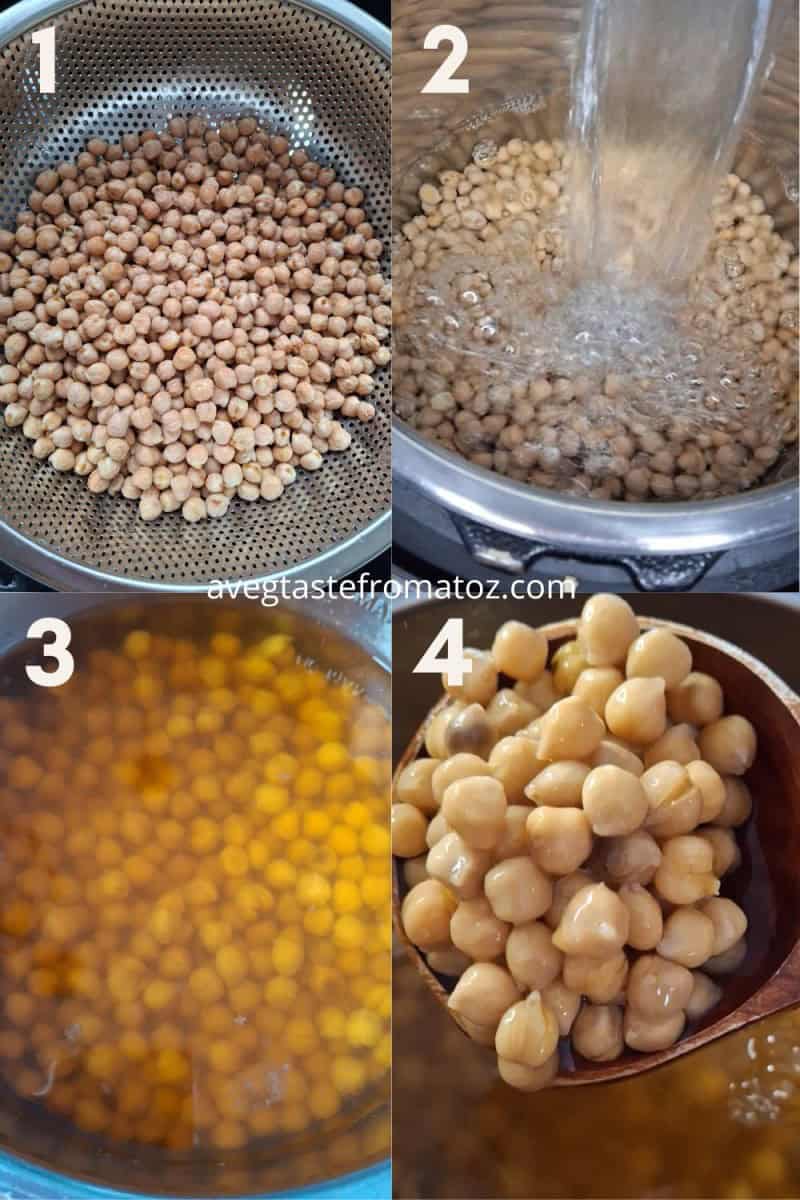
Step 1: Rinse and Soak Your Chickpeas
First, give your dry chickpeas a good rinse under cold water to remove dust or debris. Soaking is optional with the Instant Pot, but soaking for 8–12 hours (or overnight) makes them cook more evenly and gives a creamier aquafaba.
👉 Rookie tip: If you forget to soak, no worries! You can cook straight from dry beans in the Instant Pot – just increase the cooking time.
Step 2: Add Chickpeas and Water to the Instant Pot
Drain the soaking water and place your chickpeas into the Instant Pot. Add 1 litre of fresh water. This ratio usually gives you a nice balance between soft beans and a rich, starchy aquafaba.
👉 Rookie tip: Too much water = watery aquafaba. Too little = beans may scorch. Stick to the ratio until you’ve got a feel for it.
Step 3: Pressure Cook the Chickpeas
- Soaked chickpeas: Cook on High Pressure for 25–30 minutes, then natural release for 15 minutes.
- Unsoaked chickpeas: Cook on High Pressure for 40–45 minutes, then natural release for 20 minutes.
The beans should be tender but not mushy.
Step 4: Separate Chickpeas from the Liquid
Place a fine mesh sieve over a large bowl and carefully drain the chickpeas. The golden liquid that collects underneath is your aquafaba.
👉 Rookie tip: Don’t throw away the chickpeas! Use them for hummus, curries, chickpea salads, or for a plant-based ragù. This way, nothing goes to waste.
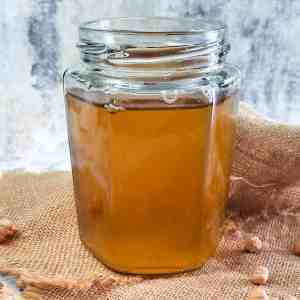
Step 5: Reduce the Aquafaba (If Needed)
At this stage, your aquafaba may look a little too thin. Don’t panic – this is normal. To concentrate it:
- Pour the liquid into a saucepan.
- Simmer on medium heat for 10–15 minutes, stirring occasionally.
- Stop when the liquid looks slightly thickened, similar to raw egg whites.
👉 Rookie tip: Test thickness by letting the aquafaba cool, then dipping a spoon. If it lightly coats the back, it’s ready.
Step 6: Cool and Store
Allow the aquafaba to cool completely before transferring it to a clean jar. Store in the fridge for up to 5–6 days or freeze in ice cube trays for longer storage (great if you only need a tablespoon or two at a time).

How to Use Homemade Aquafaba
Now that you’ve got fresh aquafaba, here are a few delicious ways to use it:
- Baking: Replace eggs in cakes, brownies, and cookies (3 tablespoon aquafaba ≈ 1 whole egg).
- Whipped cream & meringues: Whip with sugar and cream of tartar until stiff.
- Vegan mayo: Blend with oil, vinegar, and mustard for a creamy egg-free mayo.
- Cocktails: Add to whiskey sours or gin fizzes for a foamy top.
- Binding: Works beautifully in veggie burgers, falafel, and fritters.

Troubleshooting: Common Rookie Mistakes
- Too thin? Reduce it further on the stove.
- Too thick? Whisk in a splash of water until it loosens up.
- Doesn’t whip? Make sure it’s cooled completely before whipping, and add a pinch of cream of tartar for stability.
- Strange smell? That’s normal – once mixed into recipes, the flavour disappears completely.
Health Benefits of Making Your Own Aquafaba
While aquafaba itself is very low in nutrients (it’s mostly starch and protein leached from chickpeas), the benefit of making it at home is:
- No additives or preservatives compared to canned versions.
- Less sodium unless you choose to add salt.
- Budget-friendly – dried chickpeas cost far less than canned.
- Eco-conscious – less packaging waste by skipping tins.
Plus, you also get a batch of freshly cooked chickpeas – a win-win!
Serving and Pairing Ideas
Homemade aquafaba shines in both sweet and savoury recipes. Pair your aquafaba creations with:
- A vegan chocolate mousse topped with berries.
- Meringue nests filled with coconut cream and fruit.
- Savoury chickpea falafels held together with aquafaba.
- A creamy egg-free mayo spread over roasted veggie sandwiches.

Final Thoughts
Learning how to make aquafaba from scratch is one of those small kitchen hacks that feels life-changing, especially if you’re vegan, egg-free, or simply love experimenting with new techniques. With your Instant Pot and a bag of dried chickpeas, you can create a silky, reliable egg substitute that unlocks a world of recipes – from crispy meringues to creamy mayo.
So next time you’re tempted to pour chickpea water down the drain, stop! Turn it into aquafaba and let your vegan cooking game reach new heights.
Recipe
If you then want to subscribe to the blog by email, just do it by entering your email address below. You will receive an email every time a new recipe is published. No spam! Not my thing!


Leave a Reply