Making vegan ricotta at home from scratch is actually easy and highly rewarding. With just little ingredients you can create the easiest and creamier vegan ricotta cheese.
Questa ricetta è disponibile anche in italiano

Ricotta is one of those Italian cheeses that, along with mozzarella is known and largely used all over the world.
Thanks to its creaminess, sweetness and softness, this cheese is very versatile and it finds its uses in both savoury and sweet dishes, like Vegan Ricotta & Spinach Shells, Vegan Torta Pasqualina or the Iconic Neapolitan Pastiera.
I don't believe there's anyone in there that doesn't know what I'm talking about.
Being vegan or plant based means that the dairy version is off limits, as it is an animal product, like all other soft or hard cheeses.
However this doesn't mean that we must give up on this amazing product, actually we won't miss it at all thanks to the 100% plant recipe I'm about to show you in this post.
Did you know...?
Ricotta in Italian literally means "twice cooked" as the proteins and fat, which make up this product, undergo two heating: the first for the production of cheese and the second to obtain ricotta, by heating the residual whey from the processing.
The whey, left over from the processing of cheeses, is a rich and precious source of proteins with a high biological value: the whey proteins that make up the ricotta with the procedure described below.
The ricotta production technology exploits the principle of coagulation and precipitation of whey proteins favored by the acidic environment. The whey is then heated until it reaches a temperature of 60-70° C in 30 minutes and once it reaches a certain level of acidity some fat cream is added (source).

How to make vegan ricotta from scratch
Inspired by the wonderful art of making this amazing cheese, we are going to produce our own plant based version.
All we need is just a bunch of ingredients, that I list below:
- Soy Milk
- Soy Cream (the exact one we used in this Stracchino Recipe)
- Apple Cider Vinegar
- Nutritional Yeast (for a subtle hint of cheesy flavour - optional)
- Sea Salt
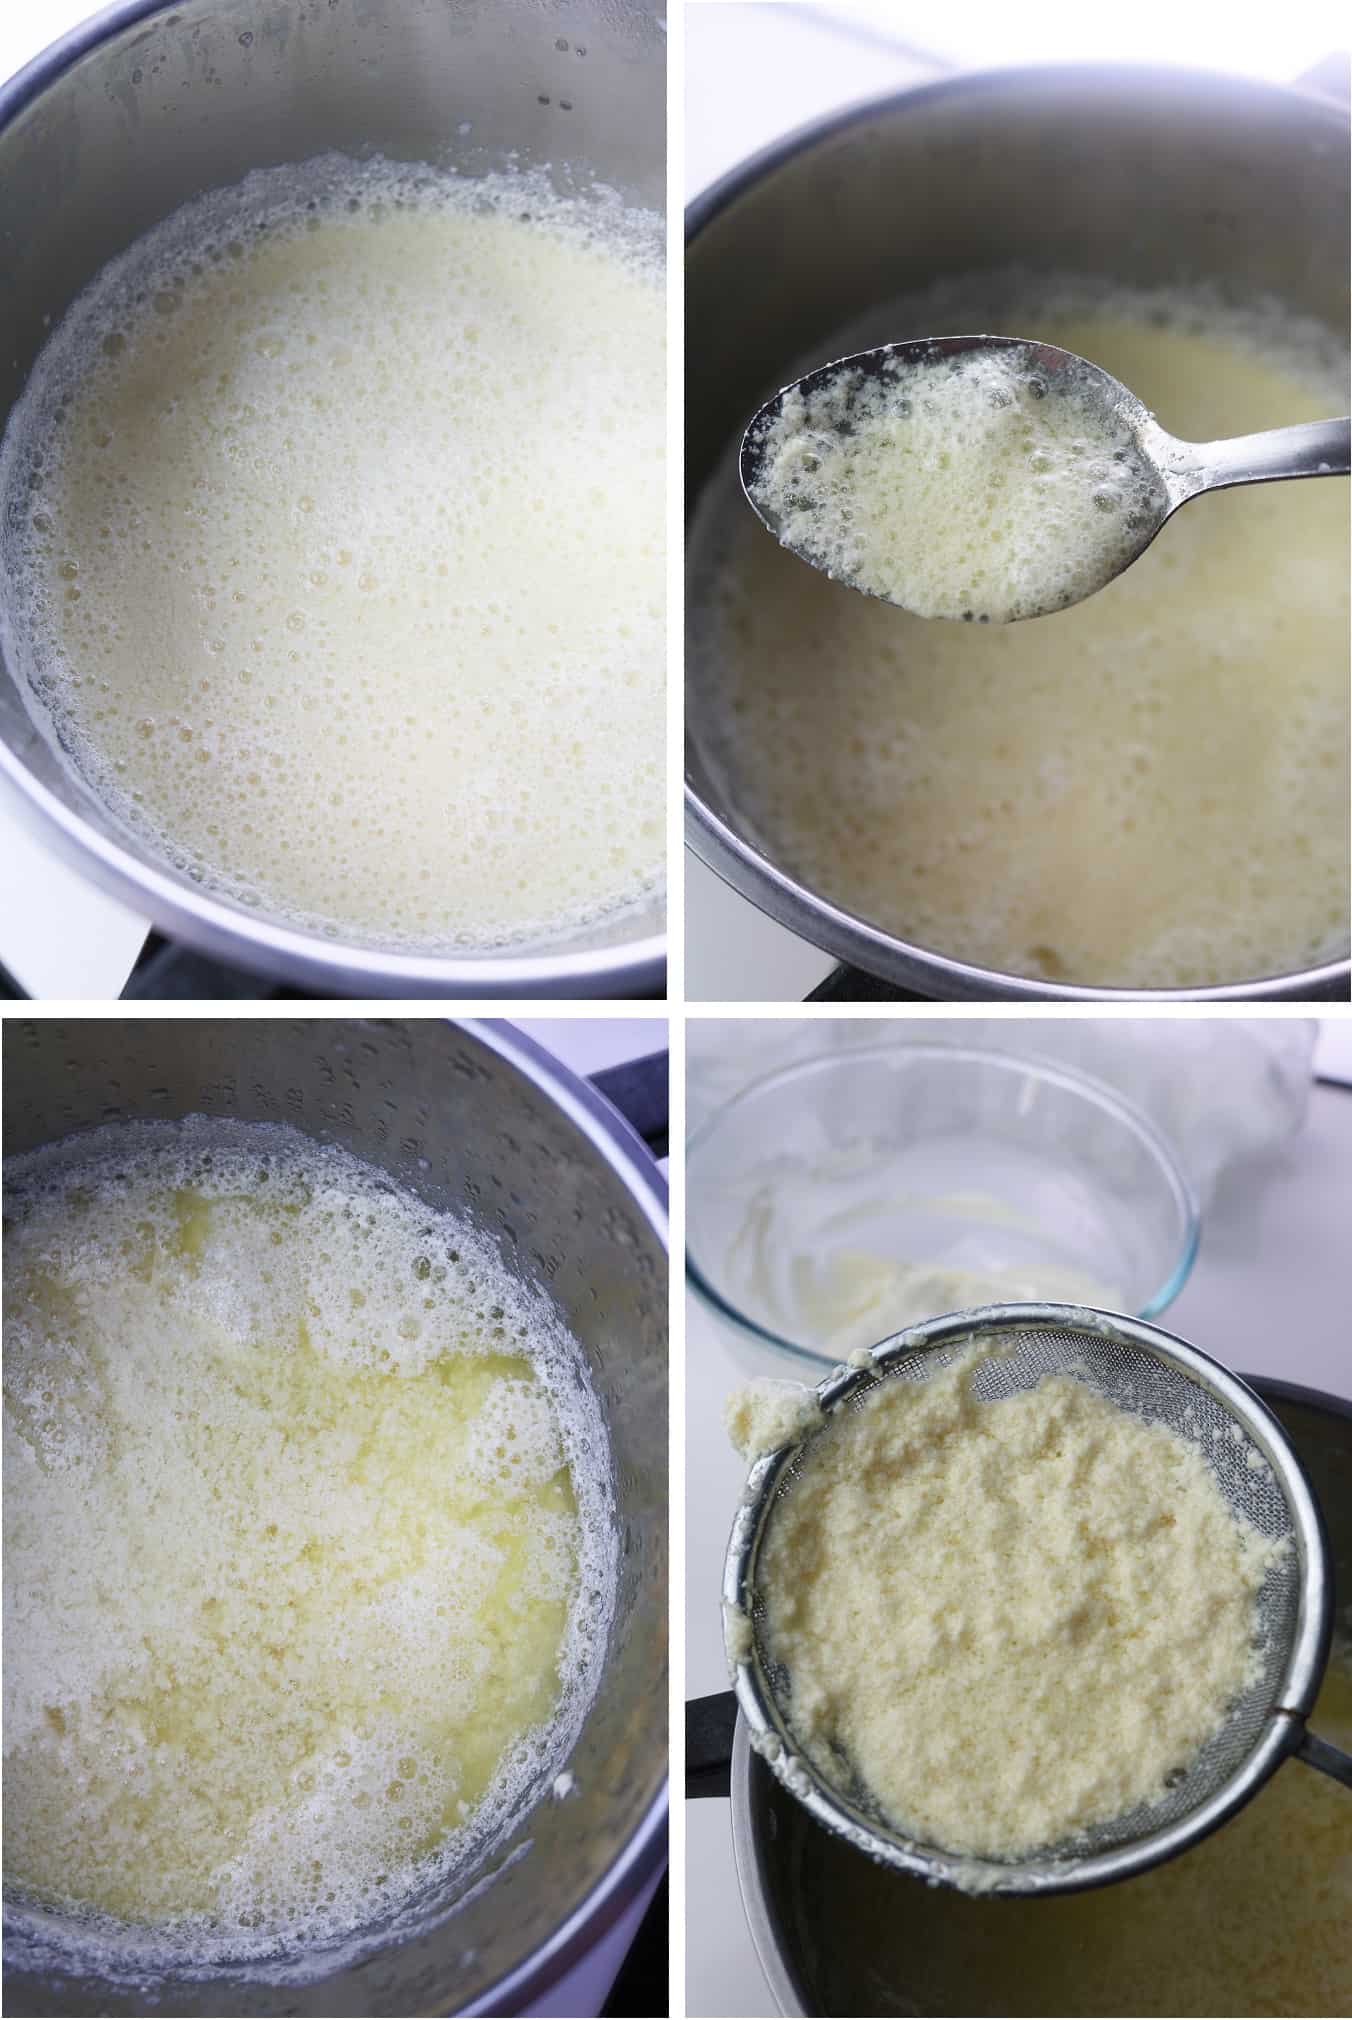
STEP 1
First we need to bring to a soft boil the plant milk with the nutritional yeast and salt. The milk doesn't need to bubble, and definitely must not overflow off the pot. It's enough to bring it to a pre-boiling temperature of around 80°C (175°F).
STEP 2
Turn off the heat and stir into the apple cider vinegar (or lemon juice) with 8 shaped movements 5 to 10 times. Then we need to cover the pot with its lid and allow to rest for 10 to 15 minutes (up to 20). Whilst stirring, you'll start noticed the liquid will begin to curdle. That's a good sign and exactly what we want to achieve.
STEP 3
The curds should be formed at this point, and they'd be floating over a yellow-ish liquid that is indeed the whey.
With a sieve collect carefully collect the curds and transfer into another sieve or drain, ideally coated in cheese cloth.
Leave to drain for half an hour or so, then transfer the mixture to a clean pot/bowl.
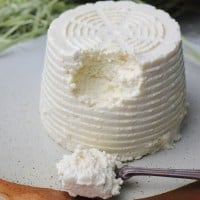
STEP 4

Stir in the homemade soy cream until well distributed, and transfer the mixture to a ricotta cheese basket (I recommend this kit that I personally use) to drain overnight. It's best to put a small dish or pot lid that is fits inside the basket, to allow us placing a small weight on top to help the drainage.
Overnight or in the next 24 hours the ricotta will loose some other liquid and become harder and compact. You should place the basket with the curds over a cooling rack (I use the microwave or the instant pot ones) over a bowl or deep plate. That way we will prevent the liquid to be in contact with the ricotta, and allow the cheese to drain properly.

Once drained we can eat the ricotta straight away, or use it in our favourite recipes, like Lasagnas, Pasta Bakes, Vegetable Rolls, or store in the fridge for up to 5 days.
If you want to make bigger batches, keep in mind that this vegan ricotta is also suitable for home freezing.
Enjoy!
Easiest Vegan Ricotta Recipe
Ingredients:
1 Liter Soy Milk
130 g Soy Cream* (less than the recipe below!)
1 tablespoon Nutritional Yeast
1 tablespoon Apple Cider Vinegar
½ tablespoon Sea Salt (or to taste)
…for the soy cream*…
125 g Vegetable Oil
65 g Soy Milk
7 g Sugar
1 g Salt
¼ teaspoon Lactic Acid (optional, but makes it taste more authentic. Alternatively use 1 teaspoon Lemon Juice)
Please note the dose of the soy cream is larger than the amount required in the recipe. You can use it to coat pasta or in other vegan cheeses (like this Vegan Stracchino), or even as a mayo. Using a lower amount it won’t emulsify ideally.
Method:
1. Add to a large pot the soy milk, the nutritional yeast and the salt, and bring to a soft boil (pre-boiling temperature; around 80°C/175°F).
2. Turn off the heat and stir into the apple cider vinegar (or lemon juice) with 8 shaped movements 5 to 10 times (whilst stirring the milk will start to curdle, that's what we want).
3. Cover the pot with its lid and allow to rest for 10 to 15 minutes (up to 20).
4. The curds should be formed at this point, and they'd be floating over a yellow-ish liquid that is indeed the whey. Carefully collect the curds with a sieve and transfer to another sieve or drain, ideally coated with cheese cloth.
5. Leave to drain for half an hour or so, then transfer the mixture to a clean pot or bowl.
6. Make the soy cream by adding all the ingredients to a deep glass and blend to smooth with a stick blender.
7. Stir in the homemade soy cream until well distributed, and transfer the mixture to a ricotta cheese basket to drain overnight over a rack and under a small weight to help the drainage.
8. Once drained we can eat the ricotta straight away, or use it in our favourite recipes or store in the fridge for up to 5 days.
Please read the full post for detailed method and tips.
This vegan ricotta is also suitable for home freezing.
You can use this plant based version in your all time favourite recipes like Lasagnas, Pasta Bakes, Vegetable Rolls, etc.
Please note the dose of the soy cream is larger than the amount required in the recipe. You can use it to coat pasta or in other vegan cheeses (like this Vegan Stracchino), or even as a mayo. Using a lower amount it won’t emulsify ideally.


Kristy
This looks/sounds amazing!! I’m going to make it this weekend. Thank you for sharing!!
Suzanne Gannon
Is the sugar absolutely necessary for this recipe to work or could I omit it? What's it doing/adding?
Adriana Z.
Hi Suzanne. Traditional Italian dairy ricotta has a sweet aftertaste to it. Sugar in here has been added to counterbalance the acidity and to indeed give the plant ricotta a more realistic aftertaste.
Hope that helps 🙂
Susy
Can I use Silk heavy creamer for from the store instead of making the soy cream?
Adriana Z.
Hi Susy, sure you can!
Hope you like it 🙂
Francesca
Can you please put the measurements in cups , milliliters and ounces I don’t understand your measurements
Adriana Z.
Hi Francesca!
The measurements are already converted, you can find them in brackets next to each ingredient 🙂
KaranP
Can I use a different milk? Instead of soy?
Adriana Z.
I honestly never tried myself.
For sure I can tell you that you won't be able to make the cream without soy, because it's the lecithin (naturally contained in soy beans) that acts as emulsifier.
You should consider a nut based ricotta like this one I posted a while back (hence not the best pictures/post), assuming you can consume nuts.
Here's the recipe: https://avegtastefromatoz.com/vegan-almond-ricotta/
Hope that helps x
Kari
I'm excited to try this. I make cashew ricotta and I need to stop eating so many cashews! However, when I try to click on the link to make the stracchino, I get an alert that the link is protected, and then the whole site freezes. I'm not sure what plugin you are using for that, but it makes it really hard to get to the other recipe.
Adriana Z.
Thank you Kari, for both the love and the heads up.
I think I've sorted the issue out now, it should work just fine. Sorry about that x
Don't forget to drop me a line if you actually try the recipe!
Have a nice weekend 🙂